
How to Authenticate Your Email in Google Workspace
Main Takeaway
Authenticating your email with Google Workspace helps keep your messages out of spam folders and protects your domain from spoofing. Follow these simple steps, and you’ll be up and running in no time.

Why Authenticate Your Email?
Imagine sending an important business email or event invitation, only to have it land in the recipient’s spam folder. That’s frustrating—and bad for business.
Email authentication helps ensure your emails are trusted by recipients’ mail servers. It tells those systems, “This message is truly from my domain.” As a result, your messages are less likely to be marked as spam or rejected.
What Are SPF, DKIM, and DMARC?
Let’s break them down in simple terms:
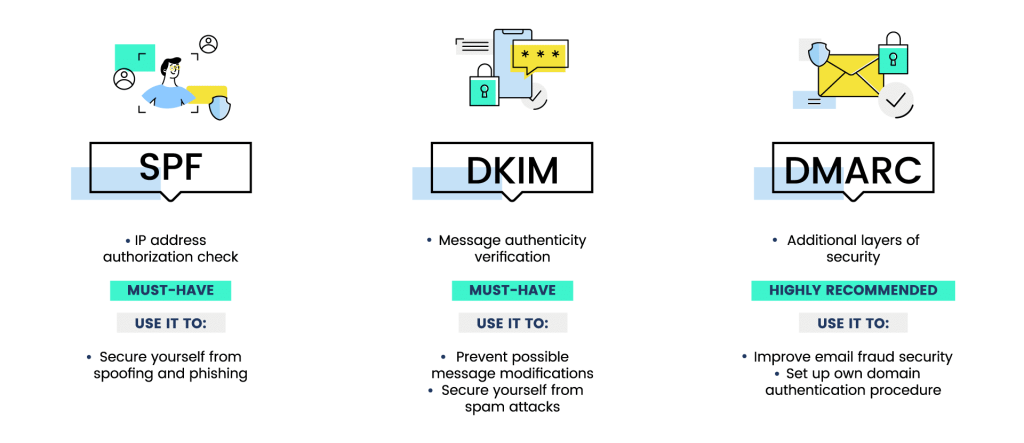
- SPF (Sender Policy Framework): Think of it as your domain’s approved sender list. It tells email servers which IP addresses are allowed to send mail on your behalf.
- DKIM (DomainKeys Identified Mail): Adds a unique digital signature to your emails, like sealing a letter with a secure stamp.
- DMARC (Domain-based Message Authentication, Reporting & Conformance): Monitors both SPF and DKIM. It instructs recipient servers on what to do if emails fail authentication checks.
In this guide, we’ll focus on setting up DKIM in Google Workspace. After that, you can add SPF and DMARC for an added layer of email security.
Step-by-Step: Set Up DKIM in Google Workspace
Step 1: Generate Your DKIM Key
- Sign into the Admin console
Log in with your Google Workspace admin account. - Navigate to:
Apps > Google Workspace > Gmail > Authenticate email - Select your domain
Choose the domain you want to protect (e.g., yourcompany.com). - Generate a key
- Choose 2048-bit (recommended for stronger encryption) or 1024-bit if your DNS provider doesn’t support 2048.
- Keep the default prefix selector (google) unless instructed otherwise.
- Click Generate.
- Choose 2048-bit (recommended for stronger encryption) or 1024-bit if your DNS provider doesn’t support 2048.
You’ll get:
- A DNS host name (record name)
- A TXT record value (your DKIM public key)
Copy both values. You’ll need them in the next step.
Step 2: Add the DKIM Record to Your DNS
- Log into your domain registrar
(e.g., creativeON, GoDaddy, Namecheap, etc.) - Find the DNS settings
Look for the option to add or edit TXT records. - Create a new TXT record
- Type: TXT
- Host/Name: Paste the DNS host name from Step 1
- Value: Paste the long DKIM key (starts with v=DKIM1;)
- Type: TXT
- Save your changes
DNS changes may take up to 48 hours to propagate, though it often happens much faster.
Note: Each domain requires its own DKIM key. If you’re using subdomains (like mail.yourcompany.com), check with your registrar for how to add records to those as well.
Step 3: Activate DKIM in Google Workspace
- Return to the Admin console
Go back to:
Apps > Google Workspace > Gmail > Authenticate email - Select your domain, then click Start authentication
- Send a test email
Send it to a Gmail or Google Workspace address (not your own). - Verify DKIM status
- Open the email in Gmail
- Click on More (three dots) > Show original
- Look for DKIM=pass in the header
- Open the email in Gmail
If it shows “pass,” your authentication is working. If not, double-check your DNS entry or refer to Google’s troubleshooting documentation.
Step 3: Create Your Custom Prefixes
Now, enter the prefix you’d like for each Google Workspace service. Common examples include:
- mail for Gmail
- calendar for Google Calendar
- drive for Google Drive
- sites for Google Sites
- groups for Google Groups
After entering each prefix, click Save.
FAQs
Typically within minutes, but it can take up to 48 hours depending on your domain host.
Yes, if you change DNS providers or want to rotate your key for added security. Just generate a new key and update your DNS.
If so, DKIM may already be active. Check your Admin console under "Authenticate email" to confirm.
Why Work with gworkspace.ae?
As a Google Workspace Official Partner and Reseller in the UAE—including Dubai, Sharjah, and Oman—we offer:
- Guided setup for DKIM, SPF, and DMARC
- Local, personalized support
- Expert help with Google Workspace configuration and best practices
Need assistance? Reach out to gworkspace.ae—we’ll help you secure your domain and optimize email delivery.
